Service Engine Group
Overview
Service Engines are created within a group, which contains the definition of how the SEs should be sized, placed, and made highly available. Each cloud will have at least one SE group. The options within an SE group may vary based on the type of cloud within which they exist and its settings, such as no access versus write access mode. SEs may only exist within one group. Each group acts as an isolation domain. SE resources within an SE group may be moved around to accommodate virtual services, but SE resources are never shared between SE groups.
Depending on the change, a change made to an SE group
- may be applied immediately,
- only applied to SEs created after the changes are made, or
- require existing SEs to first be disabled before the changes can take effect.
Multiple SE groups may exist within a cloud. A newly created virtual service will be placed on the default SE group, though this can be changed via the VS > Advanced page while creating a VS via the advanced wizard. To move an existing virtual service from one SE group to another, the VS must first be disabled, moved, and then re-enabled. SE groups provide data plane isolation; therefore moving a VS from one SE group to another is disruptive to existing connections through the virtual service.
Note: In some clouds, not all settings described below are available.
The following is the CLI used to decide the range of port numbers. These port numbers are used to open backend server connections.
configure serviceenginegroupproperties
configure serviceenginegroup Default-Group ephemeral_portrange_start 5000
configure serviceenginegroup [name] ephemeral_portrange_start 4096
configure serviceenginegroup [name] ephemeral_portrange_end 61440
Note: Default for start is 4096, default for end is 61440.
SE Group Basic Settings Tab
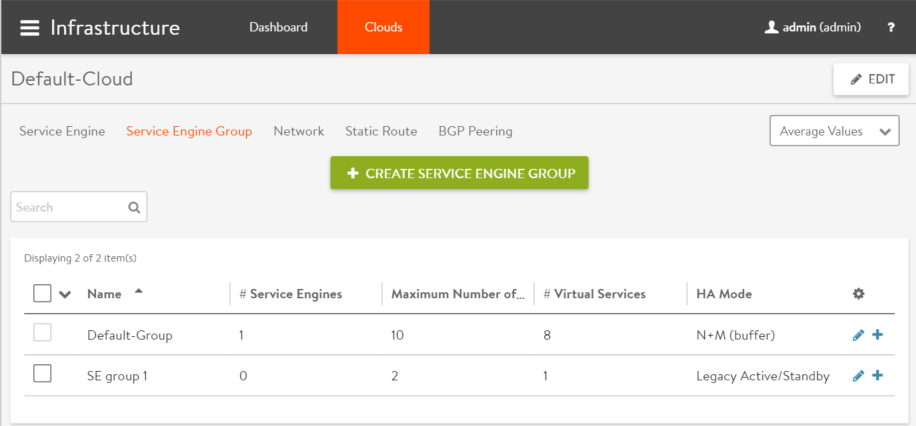
To access the Service Engine group editor, navigate to Infrastructure > Clouds > -cloudname- > Service Engine Group. Click the pencil icon to edit a pre-existing SE group, or click the green button to create a new one. Start your specification for the SE group by giving it a name (or accept the default name, which is Default-Group), as shown below.
Real-Time Metrics
At the top right of the Basic Settings tab you can turn on real-time metrics, which will cause SEs in the group to upload SE-related metrics to the Controller once every 5 seconds, as opposed to once per five minutes or longer. [More info on metrics-upload intervals.] After clicking the box, select the duration in minutes for real-time updating to last. A value of 0 is interpreted to mean “forever.”
Configuring Dynamic Threshold
The SEs send metrics data to the Controllers. The Controllers monitor the data and send alarm and notify the customer when the data is up to some thresholds.
The following is the process to configure dynamic thresholds using the CLI configuration in the Controller shell:
[admin:avi-ctrl]: > configure serviceenginegroup Default-Group
[admin:avi-ctrl]: serviceenginegroup> se_group_analytics_policy
[admin:avi-ctrl]: serviceengine:se_group_analytics_policy > metrics_event_thresholds
New object being created
[admin:avi-ctrl]: serviceenginegroup:se_group_analytics_policy:metrics_event_thresholds> metrics_event_threshold_type se_cpu_threshold
[admin:avi-ctrl]: serviceenginegroup:se_group_analytics_policy:metrics_event_thresholds> reset_threshold 30
[admin:avi-ctrl]: serviceenginegroup:se_group_analytics_policy:metrics_event_thresholds> watermark_thresholds 56
[admin:avi-ctrl]: serviceenginegroup:se_group_analytics_policy:metrics_event_thresholds> save
[admin:avi-ctrl]: serviceenginegroup:se_group_analytics_policy> save
[admin:avi-ctrl]: serviceenginegroup:> save
The following are the field details:
-
SeGroupAnalyticsPolicy— The analytics policy which defines the common thresholds for all SEs within the same SE group. -
metrics_event_thresholds— The thresholds for various events generated by the metrics system. -
THRESHOLD_TYPE_STATIC— The default metrics event type threshold for all MetricsRule objects. -
SE_CPU_THRESHOLD— The dynamic threshold type for metrics rules for Service Engine CPU usage. -
SE_MEM_THRESHOLD— The dynamic threshold type for metrics rules for Service Engine Memory usage. -
SE_DISK_THRESHOLD— The dynamic threshold type for metrics rules for Service Engine Disk usage. -
reset_threshold— The value used to reset the event state machine. -
watermark_threshold— The threshold value for which event in raised. There can be multiple thresholds defined. Health score degrades when the the target is higher than this threshold.
If the Service Engine CPU usage is higher than 56%, you can view SE_CPU_HIGH event in the Controller UI.
There will be another SE_CPU_HIGH event if the SE CPU usage is lower than reset_threshold event and higher than watermark_threshold event.
Workflow
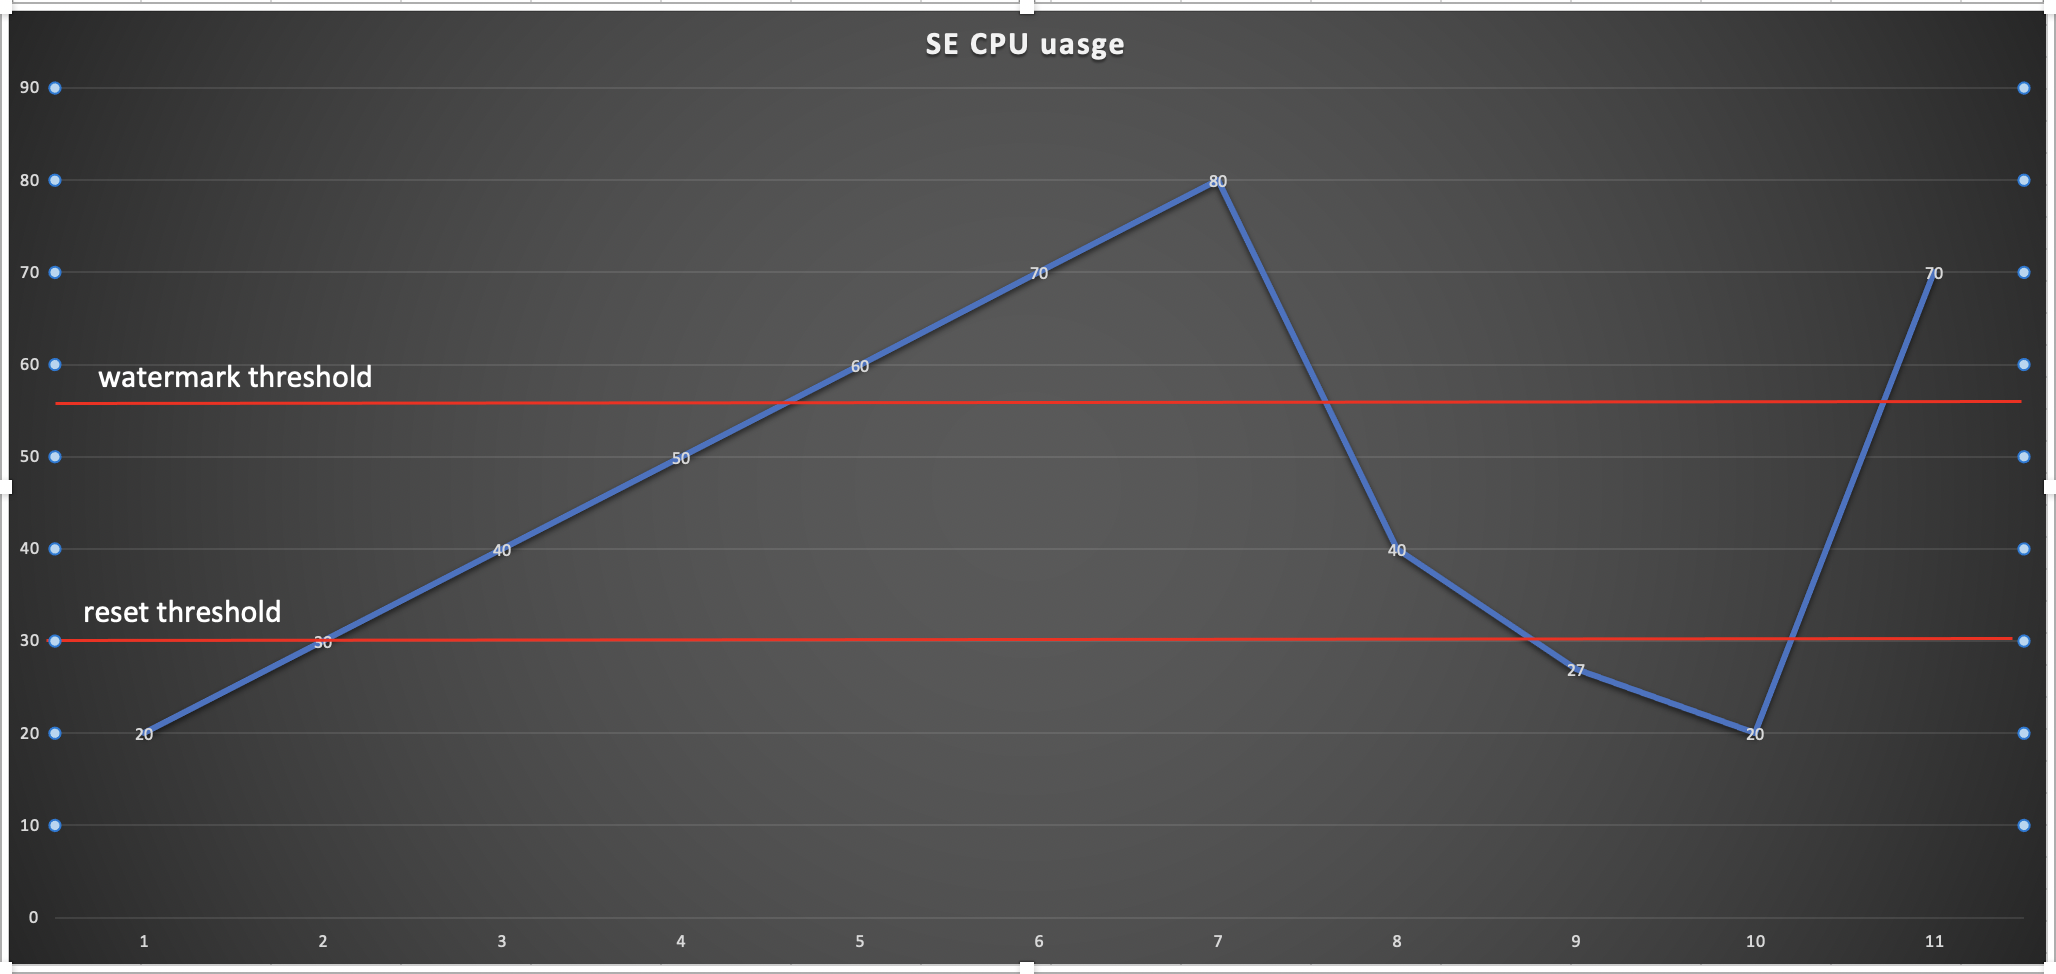
The following is the graphical representation for SE CPU usage:
In the above image, X-axis represents the time and Y-axis represents SE CPU usage in percentage.
If you monitor and record the SE CPU usage every five minutes (time interval is 5 minutes), each time point in the X-axis is the monitored time point.
-
From time 1 to time 4, the SE CPU usage is lower than the watermark threshold 56%, so no
SE_CPU_HIGHevent is generated. -
At time 5, the SE CPU usage is 60%, which is higher than the watermark threshold, hence the
SE_CPU_HIGHevent is generated in the Controller UI. -
From time 6 to time 8, since one
SE_CPU_HIGHevent is already generated and the current SE CPU usage is higher than the reset threshold 30%, hence the repeatedSE_CPU_HIGHevent will not be generated. -
At time 9, the SE CPU usage is lower than the reset threshold, the state machine in the background should be reset.
-
At time 10, the SE CPU usage is lower than the watermark threshold, no
SE_CPU_HIGHevent is generated. -
At time 11, the SE CPU usage is higher than the watermark threshold after it is reset, hence another
SE_CPU_HIGHevent is generated in the Controller UI.
Example to setup the Controller dynamic CPU thresholds
> configure systemconfiguration
	> controller_analytics_policy
		> metrics_event_thresholds
			> metrics_event_threshold_type controller_cpu_threshold
			> reset_threshold 20
			> watermark_thresholds 30
			> save
High Availability and Placement Settings
The high availability mode of the SE group controls the behavior of the SE group in the event of an SE failure. It also controls how load is scaled across SEs. Selecting a particular HA mode will change the settings and options that are exposed in the UI. These modes span a spectrum, from use of the fewest virtual machine resources on one end to providing the best high availability on the other.
- Legacy HA Active/Standby Mode — This mode is primarily intended to mimic a legacy appliance load balancer for easy migration to Avi Vantage. Only two Service Engines may be created. For every virtual service active on one, there is a standby on the other, configured and ready to take over in the event of a failure of the active SE. There is no Service Engine scale out in this HA mode.
- Elastic HA N + M Mode — This default mode permits up to N active SEs to deliver virtual services, with the capacity equivalent of M SEs within the group ready to absorb SE(s) failure(s).
- Elastic HA Active/Active Mode — This HA mode distributes virtual services across a minimum of two SEs.
For additional considerations for SE high availability, including VS placement, see Overview of Avi Vantage High Availability.
VS Placement across SEs — When placement is compact (previously referred to as “Compactor”), Avi Vantage prefers to spin up and fill up the minimum number of SEs; it tries to place virtual services on SEs which are already running. When placement is distributed, Avi Vantage maximizes VS performance by avoiding placements on existing SEs. Instead, it places virtual services on newly spun-up SEs, up to the maximum number of Service Engines. By default, placement is compact for elastic HA N+M mode and legacy HA active/standby mode. By default, placement is distributed for elastic HA active/active mode.
Virtual Services per Service Engine — This parameter establishes the maximum number of virtual services the Controller cluster can place on any one of the SEs in the group.
Per-app SE mode — Select this option to deploy dedicated load balancers per application, i.e., per virtual service. In this mode, each SE is limited to a maximum of 2 virtual services. vCPUs in per-app SEs count towards licensing at 25% rate.
SE Self-Election — Checking this option enables SEs in the group to elect a primary SE amongst themselves in the absence of connectivity to a Controller. This ensures Service Engine high availability in handling client traffic even in headless mode. For more information, refer to the Service Engine Self Election article.
Service Engine Capacity and Limit Settings
- Max Number of Service Engines — [Default = 10, range = 0-1000] Defines the maximum SEs that may be created within an SE group. This number, combined with the virtual services per SE setting, dictates the maximum number of virtual services that can be created within an SE group. If this limit is reached, it is possible new virtual services may not be able to be deployed and will show a gray, un-deployed status. This setting can be useful to prevent Avi Vantage from consuming too many virtual machines.
- Memory per Service Engine — [Default = 2 GB, min = 1 GB] Enter the amount of RAM, in multiples of 1024 MB, to allocate to all new SEs. Changes to this field will only affect newly-created SEs. Allocating more memory to an SE will allow larger HTTP cache sizes, more concurrent TCP connections, better protection against certain DDoS attacks, and increased storage of un-indexed logs. This option is only applicable in write access mode deployments.
- Memory Reserve — [Default is ON] Reserving memory ensures an SE will not have contention issues with over-provisioned host hardware. Reserving memory makes that memory unavailable for use by another virtual machine, even when the virtual machine that reserved those resources is powered down. Avi strongly recommends reserving memory, as memory contention may randomly overwrite part of the SE memory, destabilizing the system. This option is applicable only for deployments in write access mode. For deployments in read access mode deployments or no access mode, memory reservation for the SE VM must be configured on the virtualization orchestrator.
- vCPU per Service Engine — [Default = 1, range = 1-64] Enter the number of virtual CPU cores to allocate to new SEs. Changes to this setting do not affect existing SEs. This option is only applicable in write access mode. Adding CPU capacity will help with computationally expensive tasks, such as SSL processing or HTTP compression.
- CPU Reserve — [Default is OFF] Reserving CPU capacity with a virtualization orchestrator ensures an SE will not have issues with over-provisioned host hardware. Reserving CPU cores makes those cores unavailable for use by another virtual machine, even when the virtual machine that reserved those resources is powered down. This option is only applicable in write access mode deployments.
- Disk per Service Engine — [min = 10 GB] Specify an integral number of GB of disk to allocate to all new SEs. This option is only applicable in write access mode deployments. The value appearing in the window is either:
- 10 GB (the absolute minimum allowed), or
- a value auto-calculated by the UI as follows: 5 GB + 2 x memory-per-SE, or
- a number explicitly keyed in by the user (values less than 5 GB + 2 x memory-per-SE will be rejected)
- Host Geo Profile — [Default is OFF] Enabling this provides extra configuration memory to support a large geo DB configuration.
- Connection Memory Percentage — The percentage of memory reserved to maintain connection state. It comes at the expense of memory used for HTTP in-memory cache. Sliding the bar causes the percentage devoted to connection state to range between its limits, 10% minimum and 90% maximum.
Hyper Threading Modes
Hyper-threading works by duplicating certain sections of the processor that store the architectural state. The logical processors in a hyper-threaded core; however share the execution resources. These resources include the execution engine, caches, and system bus interface.
This allows a logical processor to borrow resources from a stalled logical core (assuming both logical cores are associated with the same physical core). A processor stalls when it is waiting for data it has sent for so it can finish processing the present thread. The processor may stall due to a cache miss, branch misprediction, or data dependency.
Note: The benefit of HT depends entirely on the application and the traffic pattern.
Starting with Avi Vantage version 20.1.1, two knobs are introduced to control the use of hyper-threaded cores and the distribution (placement) of se_dps on the hyper-threaded CPUs.
These two knobs are part of the Service Engine group. The following are the two knobs:
You can enable hyper threading on the SE using:
    use_hyperthreaded_cores –
    True [default] | False

    enable or disable se_dps to use hyper-threaded cores
You can control the placement of se_dps on the hyper threaded CPUs using:
    se_hyperthreaded_mode –
         SE_CPU_HT_AUTO[default]
         SE_CPU_HT_SPARSE_DISPATCHER_PRIORITY
         SE_CPU_HT_SPARSE_PROXY_PRIORITY
         SE_CPU_HT_PACKED_CORES

         controls the distribution of se_dps on hyper-threads
Note: The processor needs to support hyper-threading and use of hyper-threading should be enabled at BIOS to utilise these knobs.
use_hyperthreaded_cores — You can use this knob to enable or disable the use of hyper-threaded cores for se_dps. This knob can be configured via both CLI and the Avi Vantage UI.
The following are the CLI commands:
[admin:vpr-ctrl]: serviceenginegroup> use_hyperthreaded_cores
[admin:vpr-ctrl]: serviceenginegroup> se_hyperthreaded_mode SE_CPU_HT_AUTO
[admin:vpr-ctrl]: serviceenginegroup> save
se_hyperthreaded_mode — You can use this knob to influence the distribution of se_dp on the hyper-threaded CPUs when the number of datapath processes are less than the number of hyper-threaded CPUs online. The knob can be configured only via the CLI.
Note: You should set use_hyperthreaded_cores to True for the mode configured using se_hyperthreaded_mode to take effect.
The following are the supported values for se_hyperthreaded_mode:
-
SE_CPU_HT_AUTO— This is the default mode. The SE automatically determines the best placement. This mode preserves the existing behaviour in accordance with CPU hyper-threading topology. If the number of data path processes is less than the number of CPUs, this is equivalent toSE_CPU_HT_SPARSE_PROXY_PRIORITYmode. -
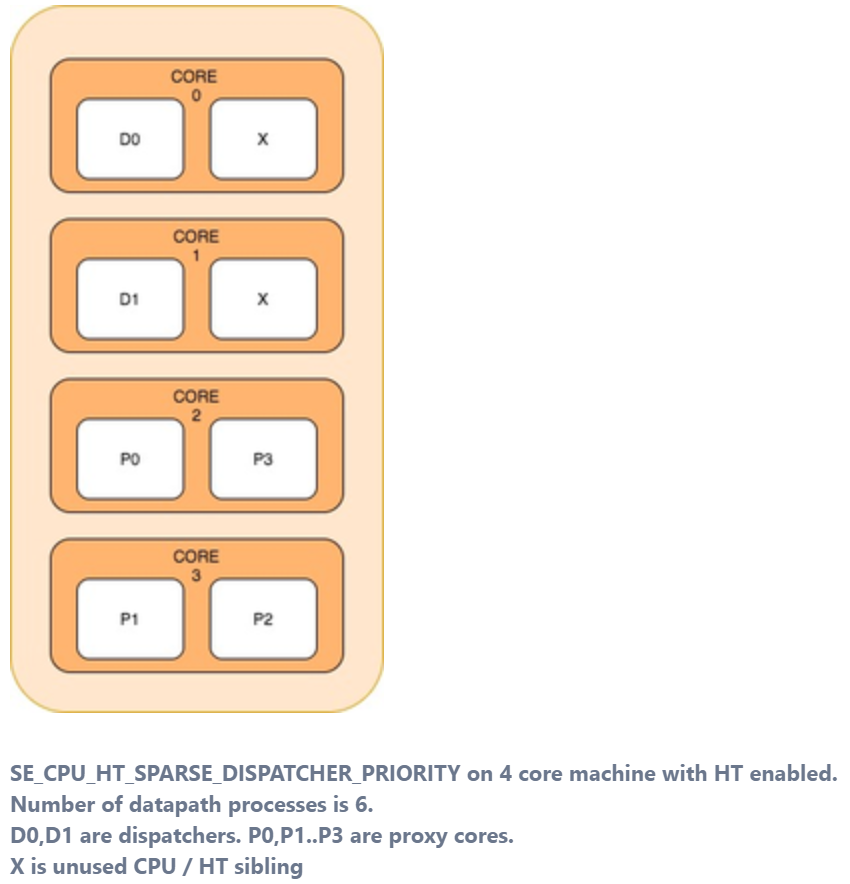
SE_CPU_HT_SPARSE_DISPATCHER_PRIORITY— This mode prioritises the dispatcher instances by attempting to place only one data-path process in the physical CPU. This mode exhausts the physical cores first and then hyper-threads in numerically descending order of CPU number. -
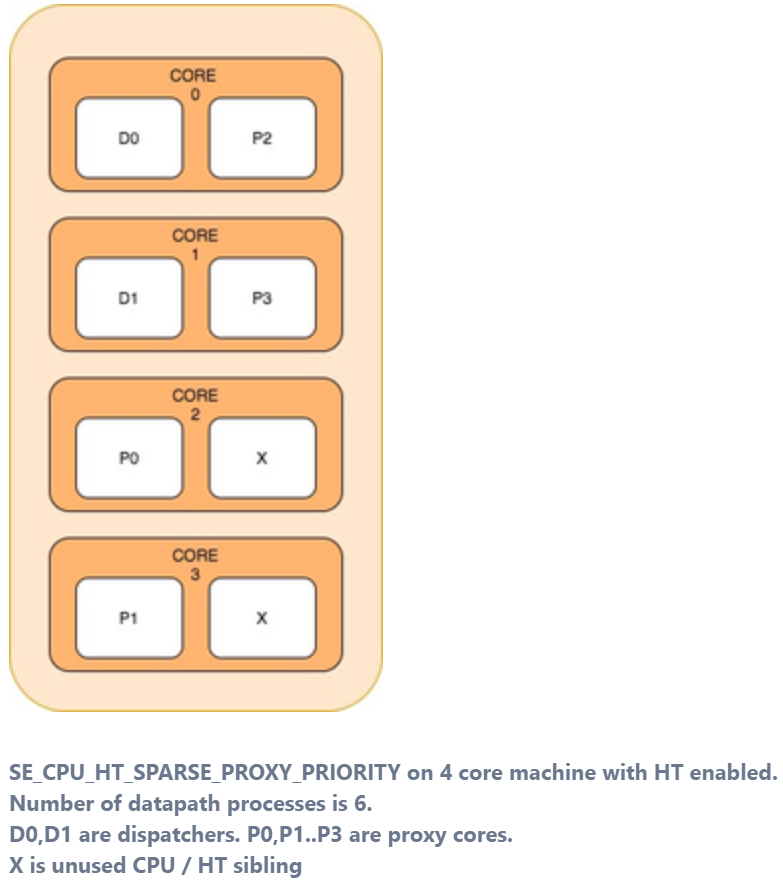
SE_CPU_HT_SPARSE_PROXY_PRIORITY— This mode prioritises the proxy (non-dispatcher) instances by attempting to place only one data-path process in the physical CPU. This is useful when the number of data path processes is less than the number of CPUs. This mode exhausts the physical cores and then hyper-threads in numerically ascending order of CPU number. -
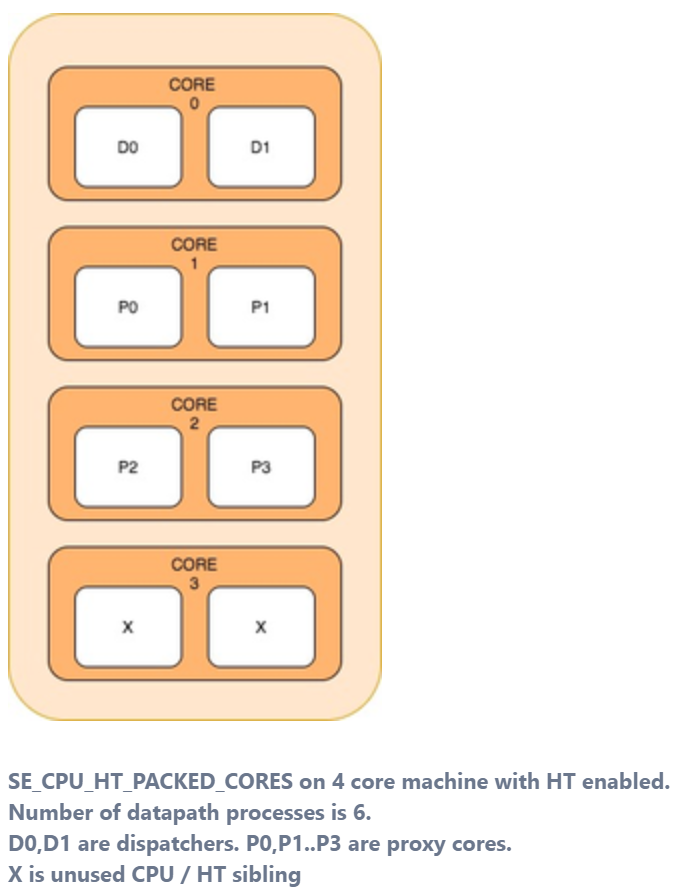
SE_CPU_HT_PACKED_CORES— This mode places the data path processes on the same physical core. Each core can have two dispatchers or two non-dispatcher (proxy) instances being adjacent to each other. This mode is useful when the number of data path processes is less than the number of CPUs. This mode exhausts the hyper-threads serially on each core before moving on to the next physical core.
When hyper threading is enabled, there is a change in behaviour with DP isolation enabled. The modes that will be affected are SE_CPU_HT_SPARSE_DISPATCHER_PRIORITY, SE_CPU_HT_SPARSE_PROXY_PRIORITY and through extension SE_CPU_HT_AUTO. With DP isolation, a certain number of physical cores are reserved to be excluded from the dp_set (cgroup of the se_dp processes). This will result in certain cores being masked from datapath’s HT distribution logic.
This number is calculated as follows: floor(num_non_dp_cpus/ 2).
For instance, if num_non_dp_cpus is 5, 2 cores are reserved for non-datapath exclusivity.
To use HT, (with or without DP isolation), the following config knobs are provided in SEgroup:
- use_hyperthreaded_cores (true/ false)
- se_hyperthreaded_mode (one of the 4 modes discussed here)
Example Configuration
 | use_hyperthreaded_cores                 | True                                                    |
 | se_hyperthreaded_mode                   | SE_CPU_HT_SPARSE_DISPATCHER_PRIORITY                    |
Service Engine Datapath Isolation
The feature creates two independent CPU sets for datapath and control plane SE functions. The creation of these two independent and exclusive CPU sets, will reduce the number of se_dp instances. The number of se_dps deployed depends either on the number of available host CPUs in auto mode or the configured number of non_dp CPUs in custom mode.
This feature is supported only on host CPU instances with >= 8 CPUs.
Note: This mode of operation may be enabled for latency and jitter sensitive applications.
For Linux Server Cloud alone the following prerequisites must be met to use this feature:
- The cpuset package
cpuset-py3must be installed on the host and be present in/usr/bin/csetlocation (a softlink may need to be created) - The task set utility must be present on the host
- pip3 future package required by cset module
For full access environments, the requisite packages will be installed as part of the Service Engine installation.
You can enable this feature via the SE Group knobs:
| SE Group Knobs | Character | Description |
|---|---|---|
se_dp_isolation |
Boolean | This feature is disabled by default. If you enable this feature, you need to create two CPU set on the SE. A toggle requires SE reboot. |
se_dp_isolation_num_non_dp_cpus |
Integer | Allows to ‘1 – 8’ CPUs to be reserved for non_dp CPUs. Configuring ‘0’ enables auto distribution. By default, Auto is selected. If you modify it, you need to reboot the SE. |
The following table shows the CPU distribution in auto mode:
| Num Total CPUs | Num non_dps |
|---|---|
| 1-7 | 0 |
| 8-15 | 1 |
| 16-23 | 2 |
| 24-31 | 3 |
| 32-1024 | 4 |
Examples:
-
Isolation mode in an instance with 16 host CPUs in auto mode will result in 14 CPUs for datapath instances and 2 CPUs for control plane applications.
-
Isolation mode in an instance with 16 host CPUs in custom mode of
se_dp_isolation_num_non_dp_cpuconfigured to 4 will result in 12 CPUs for datapath instances and 4 CPUs for control plane applications.
This feature is available as GA and the following caveats apply:
maximum se_dp_isolation_num_non_dp_cpusis limited to 8. This needs to be set explicitly. In auto-mode, the maximum is still 4.
Datapath Heartbeat and IPC Encap Configuration
Starting with Avi Vantage version 20.1.3, the following datapath heartbeat and IPC encap config knobs are moved to the segroup:
dp_hb_frequencydp_hb_timeout_countdp_aggressive_hb_frequencydp_aggressive_hb_timeout_countse_ip_encap_ipcse_l3_encap_ipc
The seproperties based APIs for these config knobs will only work for Avi Vantage version prior to 20.1.3 and they will not take any effect from 20.1.3 onwards. Likewise segroup based APIs for these config knobs will take effect starting from Avi Vantage version 20.1.3.
However, upgrade from pre-20.1.3 seproperties based configuration to 20.1.3 will automatically migrate the config to segroup as a part of upgrade migration routine.
License
- License Tier — Specifies the license tier to be used by new SE groups. By default, this field inherits the value from the system configuration.
- License Type — If no license type is specified, Avi applies default license enforcement for the cloud type. The default mappings are max SEs for a container cloud, cores for OpenStack and VMware, and sockets for Linux.
- Instance Flavor — Instance type is an AWS term. In a cloud deployment, this parameter identifies one of a set of AWS EC2 instance types. Flavor is the analogous OpenStack term. Other clouds (especially public clouds) may have their own terminology for essentially the same thing.
SE Group Advanced Tab
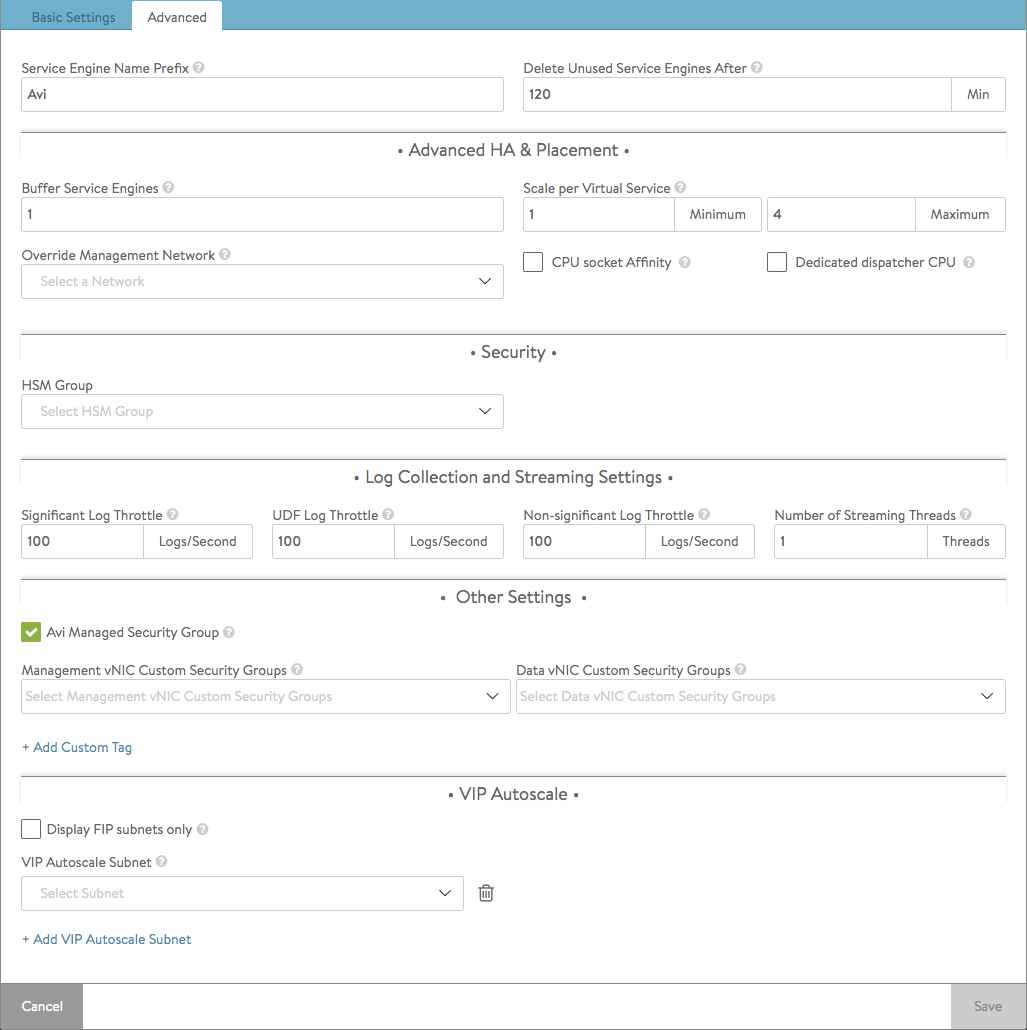
The advanced tab in the Service Engine group popup supports configuration of optional functionality for SE groups. This tab only exists for clouds configured with write access mode. The appearance of some fields is contingent upon selections made.
- Service Engine Name Prefix — Enter the prefix to use when naming the SEs within the SE group. This name will be seen both within Avi Vantage, and as the name of the virtual machine within the virtualization orchestrator.
From the 22.1.x version, use the Object Name Prefix in the cloud settings (similar to Service Engine Name Prefix); this supports “-” character.
For the 20.1.x/21.1.x versions, Service Engine Name Prefix does not support “-“ character. - Service Engine Folder — SE virtual machines for this SE group will be grouped under this folder name within the virtualization orchestrator.
- Delete Unused Service Engines After — Enter the number of minutes to wait before the Controller deletes an unused SE. Traffic patterns can change quickly, and a virtual service may therefore need to scale across additional SEs with little notice. Setting this field to a high value ensures that Avi Vantage keeps unused SEs around in the event of a sudden spike in traffic. A shorter value means the Controller may need to recreate a new SE to handle a burst of traffic, which may take a couple of minutes.
Host & Data Store Scope
- Host Scope Service Engine — SEs may be deployed on any host that most closely matches the resources and reachability criteria for placement. This setting directs the placement of SEs.
- Any — The default setting allows SEs to be deployed to any host that best fits the deployment criteria.
- Cluster — Excludes SEs from deploying within specified clusters of hosts. Checking the Include checkbox reverses the logic, ensuring SEs only deploy within specified clusters.
- Host — Excludes SEs from deploying on specified hosts. The Include checkbox reverses the logic, ensuring SEs only be deploy within specified hosts.
- Data Store Scope for Service Engine Virtual Machine — Set the storage location for SEs. Storage is used to store the OVA (vmdk) file for VMware deployments.
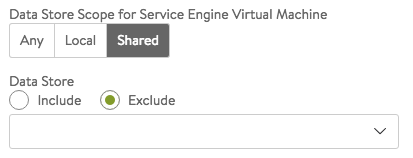
- Any — Avi Vantage will determine the best option for data storage.
- Local — The SE will only use storage on the physical host.
- Shared — Avi Vantage will prefer using the shared storage location. When this option is clicked, specific data stores may be identified for exclusion or inclusion.
Advanced HA & Placement
- Buffer Service Engines — This is excess capacity provisioned for HA failover. In elastic HA N+M mode, this is capacity is expressed as M, an integer number of buffer service engines. It actually translates into a count of potential VS placements.
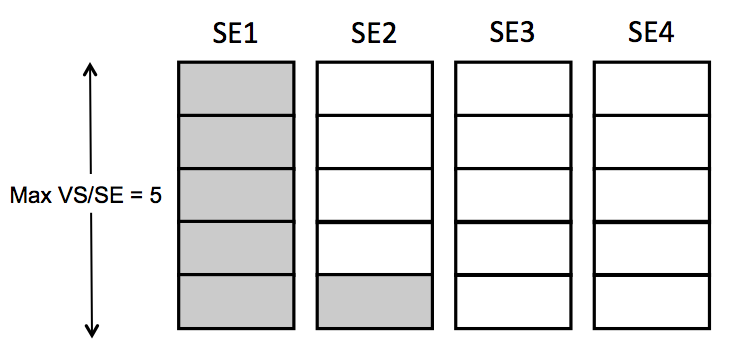 To calculate that count, Avi Vantage multiplies M by the maximum number of virtual services per SE. For example, if one requests 2 buffer SEs (M=2) and the max_VS_per_SE is 5, the count is 10. If max SEs/group hasn’t been reached, Avi Vantage will spin up additional SEs to maintain the ability to perform 10 placements. As illustrated at right, six virtual services have already been placed, and the current count of spare capacity is 14, more than enough to perform 10 placements. When SE2 fills up, spare capacity will be just right. An 11th placement on SE3 would reduce the count to 9 and require SE5 to be spun up.
 - Scale Per Virtual Service — A pair of integers determine the minimum and number of active SEs onto which a single virtual service may be placed. With native SE scaling, the greatest value one can enter as a maximum is 4; with BGP-based SE scaling, the limit is much higher, governed by the ECMP support on the upstream router.
- Service Engine Failure Detection — This option refers to the time Avi Vantage takes to conclude SE takeover should take place. Standard is approximately 9 seconds and aggressive 1.5 seconds.
- Auto-Rebalance — If this option is selected, virtual services are automatically migrated (scaled in or out) when CPU loads on SEs fall below the minimum threshold or exceed the maximum threshold. If this option is off, the result is limited to an alert. The frequency with which Vantage evaluates the need to rebalance can be set to some number of seconds.

-
CPU socket Affinity — Selecting this option causes Vantage to allocate all cores for SE VMs on the same socket of a multi-socket CPU. The option is applicable only in vCenter environments. Appropriate physical resources need to be present in the ESX Host. If not, then SE creation will fail and manual intervention will be required.
Note: The vCenter drop-down list populates the datastores if the datastores are shared. The non-shared datastores (which means each ESX Host has their own local datastore) are filtered out from the list because, by default when an ESX Host is chosen for SE VM creation, the local datastore of that ESX Host will be picked. - Dedicated dispatcher CPU — Selecting this option dedicates the core that handles packet receive/transmit from/to the data network to just the dispatching function. This option makes most sense in a group whose SEs have three or more vCPUs.
-
Override Management Network — If the SEs require a different network for management than the Controller, that network is specified here. The SEs will use their management route to establish communications with the Controllers. See Deploy SEs in Different Datacenter from Controllers.
Note: This option is only available if the SE group’s overridden management network is DHCP-defined. An administrator’s attempt to override a statically-defined management network (Infrastructure > Cloud > Network) will not work due to not allowing a default gateway in the statically-defined subnet.*
Security
- HSM Group — Hardware security modules may be configured within the Templates > Security > HSM Groups. An HSM is an external security appliance used for secure storage of SSL certificates and keys. An HSM group dictates how Service Engines can reach and authenticate with the HSM. See Physical Security for SSL Keys.
Log Collection & Streaming Settings
- Significant Log Throttle — This setting limits the number of significant logs generated per second per core on an SE. The default is 100 logs per second. Set this parameter to zero to deactivate ADF throttling.
- UDF Log Throttle — This limits the number of user-defined (UDF) log entries generated per second per core on an SE. UDF log entries are generated due to the configured client log filters or the rules with logging enabled. Default is 100 log entries per second. Set this parameter to zero to disable throttling of the UDF log.
- Non-Significant Log Throttle — This limits the number of non-significant log entries generated per second per core on an SE. Default is 100 log entries per second. Set this parameter to zero to disable throttling of the non-significant log.
- Number of Streaming Threads — Number of threads to use for log streaming, ranging from 1 to 100
Other Settings
By default, the Avi Controller creates and manages a single security group (SG) for an Avi Service Engine. This SG manages the ingress/egress rules for the SE’s control- and data-plane traffic. In certain customer environments, it may be required to provide custom SGs to be also be associated with the Avi SEs’ management- and/or data-plane vNICs.
- For more information about SGs in OpenStack and AWS clouds, read these articles:
- Avi Managed Security Group — Supported only for AWS clouds, when this option is enabled, Avi Vantage will create and manage security groups along with the custom security groups provided by the user. If disabled, Avi will only make use of custom security groups provided by the user.
- Management vNIC Custom Security Groups — Custom security groups to be associated with management vNICs for SE instances in OpenStack and AWS clouds
- Data vNIC Custom Security Groups — Custom security groups to be associated with data vNICs for SE instances in OpenStack and AWS clouds.
- Add Custom Tag — Starting with Avi Vantage 18.2.2, custom tags are supported for Azure and AWS clouds. These tags are useful in grouping and managing resources for easier management. To reveal the UI window shown below, click the Add Custom Tag hyperllnk. The CLI interface is described here.
- Azure tags enable key:value pairs to be created and assigned to resources in Azure. For more information on Azure tags, refer to Azure Tags.
- AWS tags help manage instances, images, and other Amazon EC2 resources, you can optionally assign your own metadata to each resource in the form of tags. For more information on AWS tags, refer to AWS Tags and Configuring a Tag for Auto-created SEs in AWS.

VIP Autoscale
- Display FIP subnets only — Only display FIP subnets in the drop-down list
- VIP Autoscale Subnet — UUID of the subnet for the new IP address allocation
Deactivating IPv6 Learning in Service Engines
Starting with Avi Vantage release 21.1.1, an optional field deactivate_ip6_discovery is available while configuring Service Engine group properties.
When this flag is enabled, all the notifications related to IPv6 addresses and routes are dropped. For this flag to take effect, reboot all the Service Engines present in the specific Service Engine group.
You cannot configure a static IPv6 address to Service Engine interfaces when the deactivate_ipv6_discovery is enabled.
Login to the Avi CLI and use the deactivate_ipv6_discovery command under the configure serviceenginegroup <se-group name> mode to disable IPv6 learning for the selected Service Engine group.
[admin-controller] configure serviceenginegroup <se-group name>
[admin-controller]: serviceenginegroup> deactivate_ipv6_discovery
save
Use the show serviceenginegroup <se_group_name> command to check if the knob is enabled or not.
[admin-controller]: show serviceenginegroup <se_group_name>

| deactivate_ipv6_discovery               | True                                                    |
+-----------------------------------------+---------------------------------------------------------+
Storing Inter-SE Distributed Object
The Service Engine (SE) in the Avi Vantage hosts multiple virtual services to serve a specific application. A single virtual service can be scaled across several Service Engines. Each virtual service is composed of several objects that are created, updated and destroyed. Some of these virtual service objects need to be available across all the Service Engines to ensure a consistent state of operation across a scaled-out application instance.
The current system utilises the Controller to distribute this information across the participating Service Engines. Each Service Engine has a local REDIS instance the connects to the Controller. The objects are distributed and synchronised across the SEs through the Controller.
This scheme has limitations on scale, convergence time and so on. Starting with Avi Vantage version 20.1.4, the SEs perform this distribution and synchronisation without the involvement of the Controller. The SE-SE persistence sync will be through a new distributed architecture. The VMware, LSC platforms are supported.
- The transport for the same will be on port 9001. This port needs to be made open between SEs.
For more details on port details, refer to Protocol Ports Used by Avi Vantage for Management Communication guide.
The following is the CLI command to change the default port:
configure serviceenginegroup <> objsync_port
The following is the CLI command to disable this feature:
 configure serviceenginegroup <>
no use_objsync
The following are the few debugging commands:
| Command | Description |
|---|---|
show virtualservice <> keyvalsummary |
Summary of Keyval persistence |
show virtualservice <> keyvalsummaryobjsync |
Summary of Objsync view of Keyval persistence |
show pool <> internal |
Summary of Pool Persistence |
show pool <pool_name> objsync filter vs_ref <vs_name> |
Summary of Objsync view of Pool Persistence objects |
Notes:
-
For any changes to the port 9001 via
objsync_port, you need to change the security group, ACL etc. Refer to Protocol Ports Used by Avi Vantage for Management Communication guide. -
Azure has a limitation where the
objsync_portneeds to be less than 4096. -
Starting from NSX Advanced Load Balancer version 20.1.3, the inter-SE data distribution such as IP persistence, cookie persistence, KV persistence and so on will be done over a new infra termed ObjSync. The default port used to communicate is port 9001 which can be configured via
objsync_portin Service Engine group properties.Clouds supported = All clouds
- Limitations: The
objsync_portneeds to be opened up on security groups/ ACLs for respective cloud environments.
- Limitations: The
Allow Name Change of a Datastore in VMware Write Mode
Migrations of storage can cause the renaming of vCenter datastores. This in turn can result in issues, such as the absence of SEs for VIPs, loss of resiliency, no new VIP creation, and so on.
Starting with NSX Advanced Load Balancer version 22.1.3, name change of datastores in vCenter is supported.
Notes:
- NSX Advanced Load Balancer stores datastore names in SE groups exclusively.
- After changing the name of the datastore, the
ManagedObjectIdof the datastore objects will remain the same in vCenter. Ensure you track the vCenterManagedObjectIdwith its corresponding name in NSX Advanced Load Balancer. - Operations in NSX Advanced Load Balancer will fall back to using the datastore name in the absence of
ManagedObjectIdin SE Group.
Configuring Datastore Name in Service Engine Groups
Configure Service Engine Group using datastore_name and managed_object_id commands as shown below:
[admin:10-102-96-215]: > configure serviceenginegroup TestSEG
Updating an existing object. Currently, the object is:
+-----------------------------------------+---------------------------------------------------------+
| Field                                   | Value                                                   |
+-----------------------------------------+---------------------------------------------------------+
| uuid                                    | serviceenginegroup-6eec6635-bd09-41c7-9def-3220a6393b31 |
| name                                    | TestSEG                                                 |

......
[admin:10-102-96-215]: serviceenginegroup> vcenter_datastore_mode vcenter_datastore_shared
Overwriting the previously entered value for vcenter_datastore_mode

.....
[admin:10-102-96-215]: serviceenginegroup> vcenter_datastores datastore_name blr-01-vc13c01-vsan managed_object_id datastore-1042
New object being created
[admin:10-102-96-215]: serviceenginegroup:vcenter_datastores> save
[admin:10-102-96-215]: serviceenginegroup> vcenter_datastores_include
Overwriting the previously entered value for vcenter_datastores_include
[admin:10-102-96-215]: serviceenginegroup> save
+-----------------------------------------+---------------------------------------------------------+
| Field                                   | Value                                                   |
+-----------------------------------------+---------------------------------------------------------+
| uuid                                    | serviceenginegroup-6eec6635-bd09-41c7-9def-3220a6393b31 |
| name                                    | TestSEG                                                 |
| max_vs_per_se                           | 10                                                      |
| min_scaleout_per_vs                     | 1                                                       |
| max_scaleout_per_vs                     | 4                                                       |
| max_se                                  | 10                                                      |
| vcpus_per_se                            | 1                                                       |
| memory_per_se                           | 2048                                                    |
| disk_per_se                             | 15 gb                                                   |
| max_cpu_usage                           | 80 percent                                              |
| min_cpu_usage                           | 30 percent                                              |
| se_deprovision_delay                    | 120 min                                                 |
| auto_rebalance                          | False                                                   |
| se_name_prefix                          | Avi                                                     |
| vs_host_redundancy                      | True                                                    |
| vcenter_folder                          | AviSeFolder                                             |
| vcenter_datastores[1]                   |                                                         |
|   datastore_name                        | blr-01-vc13c01-vsan
|   managed_object_id                     | datastore-1042                                          |
| vcenter_datastores_include              | True                                                    |
| vcenter_datastore_mode                  | VCENTER_DATASTORE_SHARED                                |
Additional Information
- How to Set Permanent Availability Zones for Newly Created Service Engine Group
- How to Perform an Include/Exclude Operation on a Cluster and a Host at the same time for an SE group
- Is it possible to include/exclude a cluster and a host for an SE Group at the same time from the Avi UI?
Document Revision History
| Date | Change Summary |
|---|---|
| February 1, 2023 | Updated Allow Name Change of a Datastore in VMware Write Mode section (Version 22.1.3) |
| July 15, 2022 | Updated Significant Log Throttle in Log Collection & Streaming Settings section (Version 22.1.1) |
| December 23, 2020 | Added note in Datapath Heartbeat and IPC Encap Configuration section |

